How to build a high altitude solar balloon

This balloon can deliver a 2 lb payload to 72,000 ft (22 km) and fly for as long as the sun shines.  It can be hand launched by two people without the aid of electricity and lift gas.  The envelope is built from cheap, easy to find materials.  Total construction time is 4-6 hours for a team of two.

It’s best to find a large area, such as a gym, for building the envelope.  Take care to not damage the plastic – I recommend taking your shoes off so that you can step on the balloon material without ripping it.  When it comes time to darken the envelope, I highly recommend *not* doing it somewhere where lots of charcoal dust will cause a problem.  We recently did it in a parking deck, which meant that spills were no big deal and also kept the wind from blowing the balloon around.

Materials:

-400 x 12 foot sheet of 0.33 mil plastic sheeting (sold as “light duty paint dropcloth” at hardware stores)

-Several rolls of heavy duty clear packing tape, such as these on Amazon.

-Scissors

-Permanent marker

-Tape measure

-Heavy duty string or cord (I use parachute cord)

-Air float charcoal, at least 1 lb

Building the envelope:

This is where you cut the plastic into the required shape, tape it together into a balloon, and check it for holes.  Click here to see a time lapse of this process.

Step 1: Cut the plastic sheeting into five 30 ft sections.  This is around the 10 second mark in the video above.

Step 2: Unfold them until you have five 30 x 12 rectangular sheets of plastic.  This is around the 15 second mark in the video above.

Step 3.  Fold each sheet once across the longer section and once across the shorter section.  Now you have five 15 x 6 ft sections.  This is between the 15 and 25 second mark in the video.

Step 4.  Lay the five sheets on top of each other, all facing the same way.  Find the corner that forms the center of the original sheet (this is where the fold seams all meet each other).  That corner is in the video around the 28 second mark, next to the guy in the blue shirt.  We spend

Step 5.  Consider the corner described in the previous point as the origin, the long part of the sheets as the X axis, and the short part of the sheets as the Y axis, draw the following points using a permanent marker (units in inches):

X Y

0 72

18 71

36 68

54 64

72 58

90 51

108 42

126 33

144 22

162 11

180 0

These points describe a half gore pattern, which is how we turn two dimensional objects (plastic sheets) into a 3 dimensional object (a spherical balloon).  Here, it happens to be a sine curve.  This is from the 40 to the 50 second mark in the time lapse.

Step 6:  Carefully insure that all sheets in the stack are lined up with each other (from about 28 to 40 seconds in the video).  Then, using a pair of scissors, carefully cut along the curved line defined by the points drawn on the top sheet (50-52 second mark).

Step 7: Unfold the sheets; you should have 5 diamond shaped ones.  These are gores, and they form the envelope of the balloon.  The other, roughly triangular pieces of plastic are trash (52-54 second mark).

Step 8:  Tape one edge of the first gore to one edge of the second gore using packing tape.  The seam should be centered in the tape, with no gaps between successive pieces of tape.  We have one person hold the two sheets together and the other tape them together, see photo below:

bowman_solarballoon_06.jpg

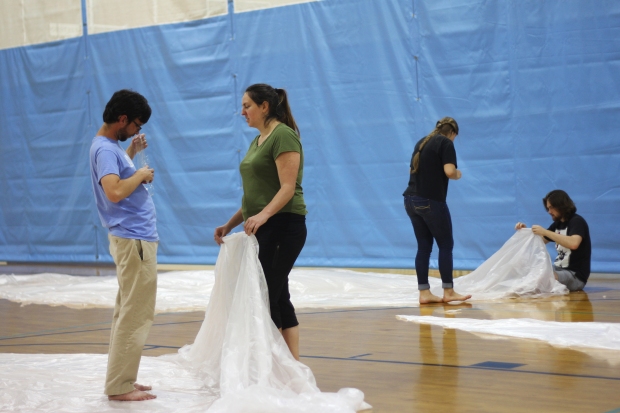
Taping the gores together.  If you have more people, you can have multiple teams going at once!  Photo by Mary Lide Parker, UNC Research Communications.

Step 9.  Add the next three gores successively, to make an ever larger sheet of plastic.  Finally, tape the two ends of the sheet together: you’ve now made a ball a little more than 19 feet across (the envelope of the balloon!)  This process takes up from the 1 minute to about the 2 minute mark in the video.

Step 10:  Find one of the two “poles” of the balloon (where the taped seams all meet).  Cut the pole off to make a hole about 5 feet across.  This will become the bottom of the balloon, and allow you to fill it with air.  We do this at 2:14 in the video.

Step 11:  Carefully tow the balloon back and forth, holding the hole open.  It will begin to fill with air.  This is from 2:15 to 2:17.

bowman_solarballoon_08.jpg

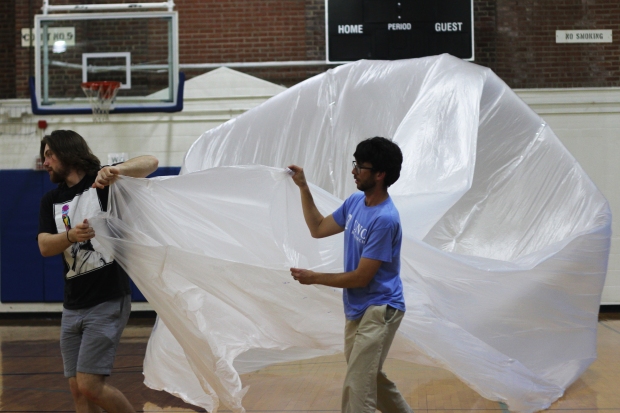
Filling the balloon with air prior to checking for holes.  Photo credit: Mary Lide Parker, UNC Research Communications.

Step 12:  At this point, it should be pretty clear whether or not you built the balloon correctly.  If everything looks good, send a brave soul inside to check the envelope for holes (gaps in seam tape are the most common culprits).  Someone on the outside can fix the holes as they are found.  Be careful, of course, since the air supply in there is finite.  This is from 2:18 to 2:36 in the video.

bowman_solarballoon_12.jpg

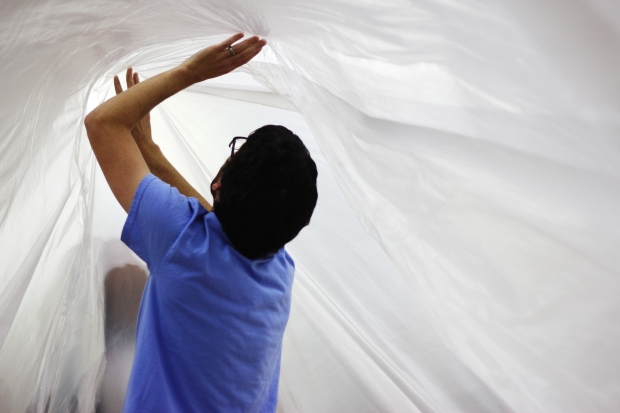
Checking each seam for holes.  Photo credit: Mary Lide Parker, UNC Research Communications.

Step 13:  Deflate and pack the balloon.  Start from the pole opposite the hole, and slowly push air towards the open end of the balloon.  Don’t go too fast or you’ll pop sections of the balloon.  It’s pretty simple to then stuff the balloon into a big garbage bag for storage.  This is from 2:37 to the end of the video.

Rigging the balloon:

The open hole on one side of the balloon is very weak and susceptible to tearing.  Also, it does not provide any means of attaching a payload.  Thus, we need to reinforce it and provide a way to attach our equipment.

A simple way to do this is to run some tape around the bottom, poke some holes in the tape, attach some string, and tie your payload on.  Our first versions had this system, but it was not ideal; in fact it is probably why we had an “unscheduled rapid disassembly” at 72,000 ft last May.

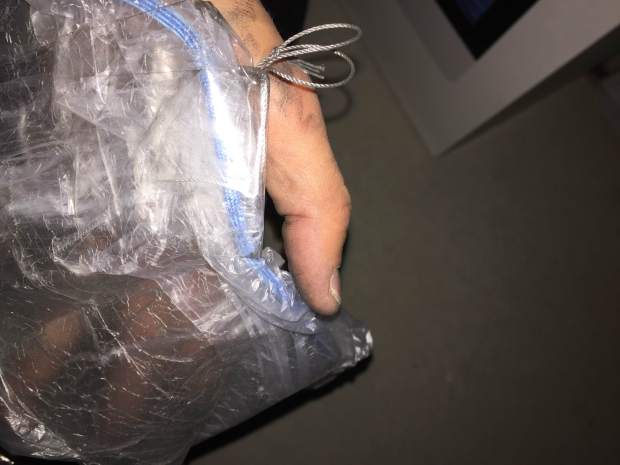
A much better way is to tie a length of strong cord (parachute cord, for example) into a loop slightly larger than the opening of the balloon.  Pull the opening through the loop, fold it around the loop, and tape the edge of the opening to the outer envelope of the balloon.  This provides a very strong lining system for the bottom.  A payload can be attached by tying guy lines onto the cord loop.  I believe the best place for these guy lines is right at each seam, since the seam tape provides a means of distributing the load along a relatively strong portion of the envelope.  The photo below shows one edge of the balloon with the parachute cord folded in, as well as one payload attachment string.

IMG_1001.JPG

Darkening the envelope:

This is the most fun part (besides launching).  Find a place that is protected from the wind but will allow you to make a big mess.  As mentioned earlier in the post, an indoor parking deck is ideal.

Unpack the balloon and lay it out on the ground. Throw a generous quantity of air float charcoal into the open end, and shake it all the way through the balloon.  The charcoal is so fine it will coat the interior of the balloon, changing it from white to dirty gray.

IMG_0871.JPG

Midway through darkening our solar balloon.

Then, wait for good weather conditions:

CkJ1x7MVAAEathy.jpg:large.jpeg

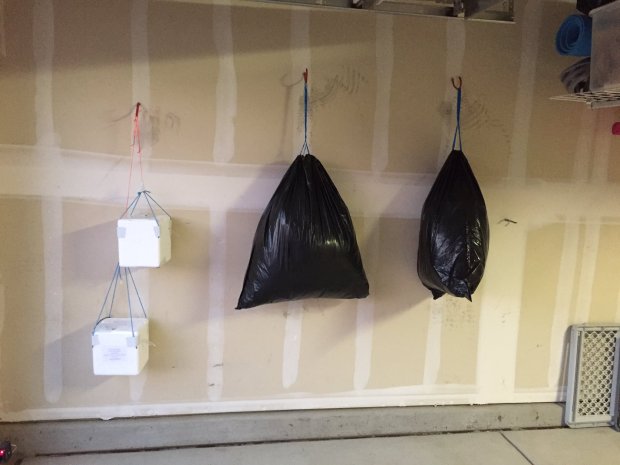
Two solar balloons and their payloads in storage.

Launching:

The launch procedure is simple: tow the balloon back and forth until it fills with air, attach the payload, let the whole thing heat up for a bit, and off it goes.   Here’s a video of us doing it.  Simple, right?  No.

Actually, launching solar balloons is hard.  It’s a lot harder than helium balloons, since ground conditions are much more restrictive.  With this in mind:

An ideal day for solar ballooning has clear skies and calm ground winds.  This is actually pretty rare, and you may have to wait several weeks for an opening.  If you start to get impatient, keep in mind that even winds barely strong enough to move leaves can make handling a 20 foot tall balloon very dicey.  Early mornings (just after dawn) are best.

An ideal site for a launch is a large open field, where slowly rising balloons will not get caught in trees, power lines, etc.  An alternative is a parking lot between tall buildings, since wind tends to go around them.  This is risky, though, since the balloon can still hit and potentially snag on them.

Finally, if you are planning on recovering your payload, realize that the balloon will fly until the sun sets.  This means that even a 10 mph wind can carry the balloon 120 miles, assuming 12 hours at float.  Many times, the winds in the upper troposphere/lower stratosphere are much stronger.  Careful consideration of the wind profile from 0 to 100,000 ft above sea level is thus imperative before attempting a full day flight with payload recovery.

Happy ballooning!

Stratospheric Solar Balloon Flight

It took three years and several false starts, but we finally got a solar balloon with a video camera on board to take off successfully.  Not only that, but the balloon reached an elevation of over 22,000 meters (72,000 feet), well into the stratosphere!  Then, it suffered what Elon Musk calls a “rapid unscheduled disassembly,” sending the payload into a 22 kilometre free fall that ended in the muddy banks of a cow pond.  Despite this, the photos, video, and GPS track were all recovered.  Here’s the flight video:

The balloon envelope consisted of a 19 foot diameter sphere of 0.31 mil clear plastic paint drop cloth.  Since the drop cloth comes in 12 x 400 foot sheets, we constructed the envelope from 5 gores that were 12 feet wide at the equator.  We attached the gores together using clear shipping tape and darkened the interior of the balloon with black paint pigment.  Each gore seam had a string attached to the bottom with black duct tape.  The opening at the bottom of the balloon is about 6 feet across, allowing two people to inflate it by hand (check out the full inflation and launch video).

The solar balloon in flight just after launch.  Image credit: Mary Lide Parker

The solar balloon in flight just after launch. Image credit: Mary Lide Parker

The payload consisted of a SPOT satellite tracker for recovery, an Arduino Uno with Adafruit High Altitude GPS Shield for trajectory determination, and a Raspberry Pi with camera module for video and stills.  The system was powered using a lithium battery pack meant for recharging cell phones (10 ampere hours).  All this was contained in a Tupperware box with a small hole to admit the camera lens.  We attached it to the balloon using four strings taped onto the box with white duct tape.  The four strings led to a fishing swivel to keep the payload from spinning too much.  We clipped it to the strings on the envelope using a black carabiner. Total payload weight was 800 grams (1.75 lbs).

payload

Payload with the lid off, showing flight instrumentation (left) and payload just before launch (right).

We kept an eye on the wind profiles for about 5 months, since most of the time winds in the troposphere blow out to sea.  Finally, we waterproofed the payload and decided to risk a flight even if some winds were going east.  On May 29, the winds in the troposphere were pretty low (max 10 m/s or so) and with varying azimuth.  The stratosphere had a steady breeze going west, so we figured if we made it that high, we’d head back over land.  However, we had a much faster ascent rate and reached a much higher altitude than we anticipated, so we ended up not flying very far from the launch site.  You can download the trajectory data in text format here or Google Earth KML here.

trajectory

Ground flight path (left), launch site is the origin. Altitude versus time (centre), local time was GMT – 4. Ascent rate versus time (right), local time was GMT – 4. I obtained the ascent rate by calculating a 1 minute moving average and dividing elevation by time.

The photos and video were very good quality considering that we were using the Raspberry Pi camera module (not the world’s most advanced camera).  The troposphere was pretty misty, and it seems like we even passed through a haze layer on the way up.  However, it could be that the lens fogged up temporarily.  Once we entered the stratosphere, the pictures are much better:

00670

The view from 22 kilometres in the sky.

You can watch a slide show of all the photos here, and all the video clips stitched together here.

Just as we approached neutral buoyancy, the payload unexpectedly separated from the envelope and fell back down to Earth.  We kept GPS tracking until about 18 kilometres elevation, and as far as I can tell the box was falling at about 320 km/hr (200 mph).  The Arduino kept track of time even after losing GPS fix, continuing to record until the moment of impact.  Thus, we know that the payload fell the remaining 18 km in about 12 minutes.  The impact speed was probably less than 100 km/hr (60 mph).  The Tupperware payload box was cracked, and everything except the SPOT tracker stopped working.  Had we landed 10 centimetres or so west, we would have splashed down in a pond.  Luckily, we hit the mud on the pond’s edge (and missed the cows that were in the area).

CGasLNHUQAAnDHG

The payload box at the impact site in Snow Camp, North Carolina.

We consider this flight mostly successful.  Our main objectives were to launch, recover, and extract data from an instrument package lifted with a solar balloon.  Furthermore, we wanted to inflate the solar balloon by hand.  Both of these objectives were reached. Our secondary goals were to fly until sunset, not land in the ocean, and make it to the stratosphere.  The flight was only about 2.5 hours, so we did not fly all day as we hoped.  However, we made it well into the stratosphere and were never in danger of ending up in the ocean.

We had a slightly tense launch when the payload got snagged on the eaves of a nearby building, but the balloon built up enough lift to detach itself in about 20 seconds.  The SPOT tracker did not record any positions during flight, so we did not know where the balloon was and were not even sure if the tracker was working.  In fact, it did not record positions until about an hour and a half after impact. The unexpected flight termination was upsetting as we did not anticipate having the payload detach from the envelope.  We assumed that either the envelope would rupture due to sun-induced heating at altitude or that it would deflate at sunset.  In either case, the payload would have had a large plastic streamer to slow it down to safe velocities.  Instead, it appears that the black duct tape we used to attach the payload strings to the envelope got too hot in the intense sunlight at 22 km.  This caused the payload to come loose from the balloon.  The lesson we learned from this is to never use dark coloured tape if there’s a chance the flight system will make it to extreme elevations.

A Hydrogen-Filled Weather Balloon Flight into Near Space

We describe a hydrogen-filled weather balloon launch in central North Carolina, and present a video, still images, and data from our GPS data logger.

Launch and Flight Video:

A view from our still camera aboard our weather balloon.

A view from our still camera aboard our weather balloon.

This flight was designated “Jake 7”, as it is our seventh tracked balloon launch attempt (5 successes, 2 failures so far).

Our goals: get video, test using hydrogen instead of helium for lift gas, try launching in close proximity to the ocean without losing the balloon, use a plastic rather than nylon parachute, and have a faster descent rate than on previous launches to cut down on flight distance.  We were also excited to get latitude, longitude, and altitude from launch to landing (our most recent flight before this one was deliberately cut down at 20,000 m, and that time the GPS only started tracking at 10,000 m).  We were not going for a spectacularly high altitude during this launch because the jet stream was blowing towards the Atlantic at 100 miles an hour.

The GPS flight data can be downloaded here:  jake7_flight_data.txt

Results at a glance:

-Hydrogen is great.  It’s cheap-currently 1/3 the price of helium and weighs less, meaning more lift.  I got a 200 cubic foot hydrogen tank for about $70, including 10 days of tank rental.  Hydrogen is also easy to find.  You can pick up a tank at a welding supply shop such as this one in North Carolina.

-Hydrogen is also very flammable and much more dangerous than helium.  Driving with a 200 cubic foot tank in the back seat is nerve wracking to say the least.  This may be a downside for the faint of heart.

-By overfilling our balloon we got a very fast ascent rate.  This cut down on our altitude (we made it to 79,000 ft, in contrast to 88,000 on Jake 2), but the upside is we didn’t lose our payload in the ocean.

-Got video and still images throughout the entire flight, but the payload was spinning very quickly.  The raw video makes one seasick and a lot of the stills are out of focus.  The edited video is the best I can do.  The spinning issue needs to be fixed in the future.

-The plastic parachute was too flimsy and tore apart during the descent, resulting in a pretty hard landing.  More on this later.

-The Arduino Uno and GPS shield recorded data through the entire flight.  Here’s an altitude versus time plot (see the raw data link above):

Ascent and descent of Jake 7.

Ascent and descent of Jake 7.

Equipment List:

a 600 gram weather balloon from Kaymont

a 200 cubic foot tank of hydrogen

one SPOT satellite tracker, so you know where the balloon went

one Arduino Uno flight computer with high altitude GPS data logger

two lunch boxes

tubing to move hydrogen from the tank to the balloon (1 inch inner diameter, if I recall right – measure the tank outlet)

plastic parachute (I will describe how I made it, but it failed! this is a “what not to do”)

Canon still camera, configured using CHDK to take pictures every 10 seconds

Kodak PlaySport video camera

zip ties

rubber bands

string

The Flight

I used a Python script I wrote to predict where the balloon would go based on the weather forecast.  Since we had a strong (~100 mph) jet stream, we found that there was a good chance of a water landing if the balloon ascended or descended slowly.  So we filled the balloon with a lot more gas than usual so it would rise quickly.

2013-03-30 10.17.31You can see two nice bright lunch boxes for the payload.  We had to use two because the SPOT GPS interferes with the Arduino GPS logger.  The launch site was near Saxapahaw, North Carolina.

After release, the payload swung back and forth violently.  Sometimes it was almost parallel to the ground.  This swinging motion was probably because the balloon was rising quickly through a fair amount of wind shear.  We watched the balloon disappear into a partly cloudy sky, and tracked it for about 20 minutes with the SPOT.  After that, it was above the SPOT maximum altitude, so we had to wait and hope it talked to us on the way down.

The black sky of near space.

The black sky of near space.

At high altitudes, the payload box spun rapidly.  This made for some nausea-inducing video!  The burst is audible, however, and the camera swings up briefly just after the pop.  You can see the expanding ball of plastic shreds in the YouTube video.  Pretty neat!

As the payload descended, the video camera swung upwards and pointed at the sky.  The still camera swung down and looked straight at the ground.  This is probably because the still camera was heavier, so the payload was off balance.

The still camera took excellent pictures until it went lens-first through a cloud.  All the pictures are foggy from then on.

Fourteen miles is a long way to fall!

Fourteen miles is a long way to fall!

The last photo before the cloud:

Moments before hitting the cloud.  The shadow of the payload is in the center of the halo.

Moments before hitting the cloud. The shadow of the payload is in the center of the halo.

The payload started falling at about 150 miles per hour.  As it descended, it encountered denser air and slowed to a fifth of its initial velocity.  I designed the parachute to slow everything down to 20 mph – but the thin plastic I used ripped during the descent, so the payload fell 10 mph faster than expected.  Everything survived just fine except for a crack in the Arduino case.  In addition, the lens cover no longer closes on the Canon camera.

We were very fortunate during the landing.  Had the balloon burst any later, the payload would have landed in a forest full of gigantic trees.  Instead, we found our lucky pink lunch boxes lying in a fallow cotton field in Selma, North Carolina –  about 50 feet from the forest margin.

Carrying the payload from the impact site.  The Canon is still taking pictures!

Carrying the payload from the impact site. The Canon is still taking pictures!

The moral of the story is: make a strong parachute.  I used the thinnest paint dropcloth I could find at Lowes (this material is what we use to make our giant solar balloons) to save on weight and also because I had it lying around already.  However, this plastic rips easily in the best of conditions.  Falling at 150 mph through thin, bitter cold air is certainly not a good place for it to be.  Next time, we’re going for the rip stop nylon parachute we used in our first weather balloon launch.

The take home message:

-Hydrogen is cheaper and lifts better.  We will be using it from now on, and thinking non-flammable thoughts as we do.

-Parachutes should not be made of plastic, and should be tested before deployment.  I think I will hold one out the window of the car at 20 or 30 mph.  If it can survive that, it will work (note that it falls 150 mph at 80,000 ft, but the air is thinner so the force is the same).

-A fast ascent seems to lead to bad image and video quality.  In any case, though, we need to think hard about how to make a stable camera platform.

We’ll leave you with a couple more cool plots – one showing ascent and descent rate, another showing the windspeed vs elevation, and a final one showing the flight track.  All of these plots were made using the data set included in this blog post.

The ascent and descent velocity.  The first jump is when we launched.  The switch to negative values is the descent.

The ascent and descent velocity. The first jump is when we launched. The switch to negative values is the descent.  Time should be in seconds, not hours.

This shows why you have to travel through the jet stream quickly if you want to avoid downwind locations.

This shows why you have to travel through the jet stream quickly if you are on the East Coast and the wind’s blowing east.

The balloon flew from the left to the right, starting at Saxapahaw and ending at Selma.  The gap is where the balloon burst.

The balloon flew from the left to the right, starting at Saxapahaw and ending at Selma. The balloon burst at the origin of the plot.

17 Miles above New Mexico – A High Altitude Balloon Flight into Near Space

I’m back after a brief intermission to tell you how to do one of the neatest things I have ever done-flying a camera on a weather balloon into the mid stratosphere, where the sky is black and the horizon is curved.

We are definitely not the first people to do this; in fact it seems like every other day I hear about some high schooler launching a balloon into near space.  But when it comes down to it, who cares how many times it’s been done?  The pictures are spectacular:

Image

A YouTube video with the photo sequence and some cool music:

Want the individual pictures?  Have the entire photo set!

Note:  the photos are released under the Creative Commons with Attribution license.  If you display the photos for anything other than home use, please caption them with “Courtesy of Bovine Aerospace”.

How to do this yourself

The goal is to get a camera really, really high.  You could use rockets, of course, but they are hard to build, very regulated, and have a tendency to explode.  There is an easier way, however-just use a really big balloon.  Here are the things that have to happen for this to work:

1.  You need to lift the camera and protect it during flight.

2.  The camera needs to either record video or take photos every so often.  We did the latter.

3.  The balloon needs to release the camera so you can get it back.

4.  You need to be able to track the camera so you can find it again.

5.  You need to slow the camera on the descent so it doesn’t smash itself into smithereens.

6.  Last but definitely not least, the camera needs to land in the appropriate place (i.e. not water, rough terrain, or a military base).  We had some issues with this…

Materials:

weather balloon

camera

SPOT tracker

GPS cell phone

styrofoam cooler

string

tubing

ripstop fabric

helium tank

zipties

hand warmers

Lifting the camera

We used a Canon A530 camera (around $30 used on Amazon) and we used the CHDK package to make it take a picture every 10 seconds.  If you are not a programmer, either buy a camera that you can set to take a picture every so often or use a video camera.

We bought a Styrofoam cooler to protect the camera, and we threw in some hand warmers to keep it warm (it gets cold up there…like -90 F).  We also had the tracking system in the cooler (more on that later).

We used a 600 gram weather balloon from Kaymont to lift the cooler.  You can fill the balloon with hydrogen or helium.  We used helium.  It’s available from welding supply shops (you can buy 200 cubic feet for around $80, we used about half of that).  Hydrogen is cheaper and will give you slightly more lift but it is harder to find and also extremely flammable.

Here we are with our balloon, parachute, and instrument package:

Once the balloon reaches a certain height (75,000 to 90,000 ft, for our balloon), it pops and the styrofoam cooler starts its descent.

Tracking

You must track your balloon in order to get it back.  Otherwise, unless you are extremely lucky and find your camera or someone else finds it and mails it to you, your camera will disappear into the sky and never be heard from again.

There are a couple of ways to track your camera.  If you have good cell phone coverage where you expect the balloon to land (see section below on landing prediction), you can use a GPS enabled smart phone with the free Instamapper app.  However, if you are concerned that the balloon might land in a place with poor cell reception, use the SPOT tracker.  We used both Instamapper and SPOT.  The cell phone never answered on the way down, so if we hadn’t had the SPOT we would never have gotten our photos back.

If you are into HAM radio, you could also use radio telemetry.  I think there are websites that describe how to do this but I have no personal experience with it.

The Landing

A styrofoam cooler that falls 17 miles will hit the ground pretty hard.  We found this out on the first launch we tried (we think the parachute failed…we never found the camera).  So it is very important to slow your falling camera down with a well made parachute.  You can buy parachutes online, but my friend and his girlfriend ended up making ours out of ripstop nylon.   Here’s a picture of the parachute:

You can use this online calculator to design a parachute that will work for you.  I believe that you want your camera to land at less than 15 mph.  After our first failure I was very conservative and designed ours to land at 6 mph. As I recall the cooler was undamaged (and styrofoam is pretty fragile!).

If you decide to design your own parachute, you can use this website to make a sewing or taping pattern.  I also have a python script that will generate half sphere gores, and when I post it I’ll add the link here.

A couple of parachute construction notes:

Make sure that the parachute is a long way below the balloon.  That’s because the shreds of material created when the balloon bursts can get tangled in the parachute and prevent it from opening…bad news for your 17 mile fall.  Also, put in a spreader (a circle of tubing) near the parachute to make sure it is slightly open, so that when the balloon pops and the whole thing starts to fall, the parachute can open.  Here’s a photo of the balloon in flight; note how far the parachute is from the balloon:

Predicting Where the Balloon Will Go

Balloon flight prediction depends on weather prediction.  If the weather prediction is accurate, then this website will give you a very good idea of where your balloon will end up.  If the weather prediction is not accurate…good luck.  In our case, a snowstorm had just passed, and the jet stream was swinging north.  Since the winds were changing direction so quickly, our balloon actually landed 50 miles south of where we predicted.  That’s why it ended up in the mountains, and that’s why it took a 3 day hike to get it back.

A Final Note on Legality

What we did was legal under FAA regulations.  However, it is your responsibility to ensure that whatever you do is legal.   Find the regulations here.  If you are not sure, contact your regional FAA office.