This post goes over how to make a GPS based cutdown for your high altitude weather balloon. FAA regulations (FAR 101) require that unmanned balloons have two methods of flight termination. While balloon burst at high altitude is usually a very reliable way to end your flight, if there is any risk of the balloon reaching neutral buoyancy, such as with launches designed maximize elevation, a secondary cutdown is useful.
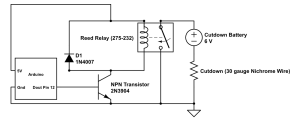
For our cutdown we used a ‘thermal knife’ made of 30 gauge nichrome wire (a type of wire also used in toasters). To trigger the cutdown we used an Arduino Uno board and the “ultimate GPS” from Adafruit. The Arduino checks the GPS coordinates every 60 seconds, and if the GPS has crossed some preset line (for example, the balloon is 30 miles from an ocean or great lake) sends the cutdown signal. Alternatively, you could use a limit on time aloft to trigger the cutdown. The Arduino cutdown signal triggers a transistor to switch on a reed relay, which completes a circuit with the nichrome wire and a battery pack. The reed relay is needed because the large amount of current that flows through the cutdown circuit loop would fry the transistor! A circuit diagram (created with Circuit Lab) is shown below:
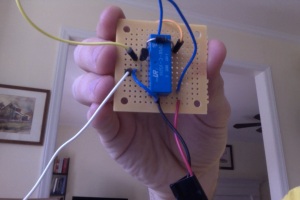
And picture of the circuit soldered on perf board:
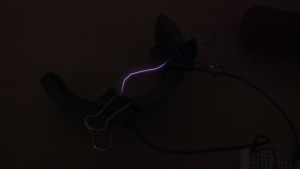
We used a battery pack with 4AAs to power the cutdown, which provides sufficient current to get the nichrome wire glowing red hot:
For balloon flight, the nichrome cutdown wire was coiled around the line between the balloon and the payload and sheathed in heat shrink tubing. The setup is shown below:
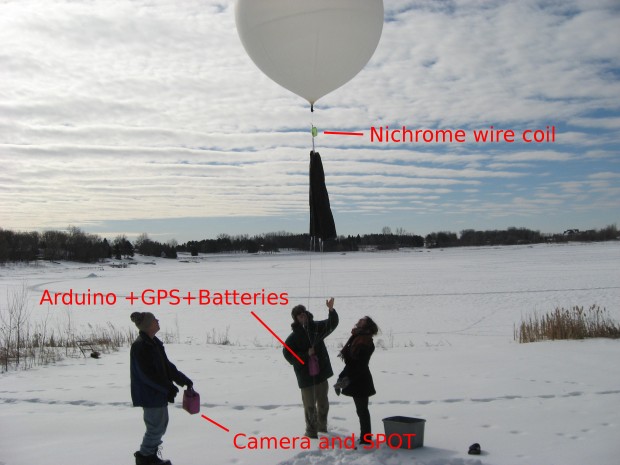 As a first test of our cutdown mechanism, we launched a balloon with the Arduino set to trigger the cutdown at 20,000 m. Our blog post about the launch is here, and pictures from that cold snowy day are here. As show below the cutdown worked perfectly, terminating the ascent at 20,082 m:
The Arduino sketch that we made to do all of this is based on the Adafruit Ultimate GPS Library, and is available here.

Hi there. I really like the cutdown module. Is there any way I could py you to build me one? If so please message me back or email chrishillcox1@hotmail.com
I will also feature it on http://www.balloonnews.wordpress.com
You are based in the UK, right? I think it would be more trouble than it is worth to ship electronics from the US. It would probably be easier for you to pick up the parts locally and assemble them yourself. This cutdown is relatively straight forward to make and we would be happy to help if you have any questions about the circuit or code.
Also, great website — certainly anyone getting into ballooning could benefit from this centralized resource.
Thanks for your reply. Unfortunately I don’t really have the skills to develop this, either with the electronics or coding. And now I have a need for a cutdown to help a HAB project for a charity here in the UK. Are you sure you don’t take commissions. It would really be appreciated and I can pay for the materials and something for your time. Many Thanks Chris – chrishillcox1@hotmail.com
Out of curiousity – why do you need a cut down? If you’re doing HAB, the balloon will burst and the payload will return that way. Our first two launches, and our one in North Carolina, did not have cut downs.
Pingback: Stopwatch Based Cutdown/Solar Balloon Inverter | Bovine Aerospace
I’ve been looking at the relevant FAA regulations, and as far as I can tell a balloon with a payload less than 6lbs is unregulated.
Section 101.1(4) spells out the requirements that an “unmanned free balloon” has to meet before it’s regulated under this section, and it looks like anything under 6lbs doesn’t meet the threshold.
So…. I read this to mean that neither a radar reflector, nor a cutdown mechanism, is required for balloons under 6lbs.
Thoughts?
First off, I am not a lawyer, so take my thoughts with a grain of salt. As I recall, balloons under 4 lbs are fine, balloons between 4 and 6 lbs need to be below a certain density, and payloads above 6 lbs need to have a cutdown system. However, you will note that there is a catch-all provision that says your balloon cannot present a danger to life and property no matter what it weighs. So if your 3 lb balloon payload has no parachute and ends up smashing someone’s windshield, or your payload causes a car crash on the highway, or your balloon ends up in a power line and shorts it out, you will be liable for civil and perhaps criminal penalties. So I would not go so far as saying they are “unregulated,” but I believe you’re correct that they don’t need cutdowns and the like.
Hello anatine_aero and glossarch,
I am a student based in the UK and I stumbled across your page whilst looking for a method to pop a balloon with a wire. I have managed to identify sources for all the components you used, except for your small size stripboard/VERO board, which I have been unable to find online, so if you can tell me where I could find it I should be able to recreate this.
I discussed this idea with an electronics lecturer at my university because I would like to incorporate it into a project and he suggested that the circuit could be modified, whereby the reed relay and NPN transistor could be replaced with an MCT6 optocoupler (with a 200 Ohm resistor connected to pin 1 of the optocoupler and a 1k Ohm resistor connected to pin 8 of the optocoupler) and a 2N7269 MOSFET.
That’s a little hard to describe without being able to attach an image but what do you think?
Have you got an e-mail address to which I could send you an image of the circuit I created in National Instruments’ MultiSim, following my lecturer’s advice?
Yours sincerely,
FlyPhi
To answer your questions:
1) Yes, you should be able to use an optocoupler instead of a reed relay
2) We used perfboard from Radioshack (link) but can use whatever you have on hand
3) I think the 6V 11 A battery might not be enough – but the only way to be sure is to hook up your battery to a length of nichrome wire and test if it gets hot enough to pop a balloon. I have found that a standard 9V battery will get ~3 inches of 30 gauge nichrome wire hot enough to melt nylon cord in about 10 s – so you might try that. Always keep in mind that there is a potential fire hazard if you are sending something like this into the air on an uncontrolled balloon. We are may switch to a mechanically based balloon cutdown in the future.
4) You can use any other digital pins (2-12 on the uno) to send the signal
Good Luck!
Thanks your for such a quick reply!
I see, just out of interest do you have a link for the TE Connectivity reed relay you used? Is this the same one: http://uk.rs-online.com/web/p/reed-relays/2562049/ ?
Ok, I’ll try that! We could use a mechanical set up with a servo or something but we’d rather save weight and use this method.
Great, glad to hear it!
Thanks 🙂
Also, you said you used a battery pack with 4 x AA batteries, but I’ve picked up a tiny key fob 6V 11A battery (10mm x 16mm), which would fit into a shortened single AAA battery holder – do you reckon that would work fine instead?
One more thing, if the Dout Pin 12 on my Arduino (APM 2.6) is already being used by an external GPS/Compass unit, which pin would you recommend that I use?
I cut some nichrome out of a toaster and couldn’t get it hot enough to go– longer means more resistance, and it took a whole toaster panel to get hot. What was your nichrome source? we’re going to use tungsten lightbulb filaments or rocket engine igniters, probably. The tungsten filament burns out and melts wire really well off a 9v battery, but they’re pretty fragile.
I got the nichrome wire we used from eBay. For example:
http://www.ebay.com/itm/Nichrome-wire-30-gauge-30-feet-/321050462953?pt=LH_DefaultDomain_0&hash=item4ac0194ae9
You only need a short length (< 1 in) of wire for the cutdown. You might also try a physical cutdown, like a glider tow release, which isn't a fire risk:
http://www.hobbyking.com/hobbyking/store/__13365__hobbyking_glider_nose_tow_line_release_11_7x42mm_.html
Pingback: Balloon Cut Down System | ozhab
When sizing the nicrome-style wire there are two primary design restrictions: 1) how much power does the battery have and 2) how hot does the wire need to get to melt the synthetic line?
I successfully made an Arduino-based cut-down device (https://swsdt.com/shop/doongara_balloon_cut-down/) that operates from a single AA lithium battery by reducing the wire size even further (<40 gauge) . The small wire size requires a mechanical assembly to hold it instead of relying on the wire strength to stay wrapped around the line, which introduced a new series of design challenges. I use a zip-tie to provide tension to ensure the line is in contact with the wires. I also use a small line to ensure it didn't melt back together as it is cut.
The single battery doesn't provide enough extra power to run a GPS module for any significant period of time but is enough for a pressure sensor. Because it is powered from a single AA battery, the unit is very light and can be attached on-top of the parachute without worrying about it collapsing the chute during descent.
Your device looks pretty slick. I like that it is light weight and can sit above the parachute. Because we were using 4AAs to power the the nichrome, we had to haphazardly run wire all the way up from the payload where the battery pack sat. Luckily, it the chute did not tangle, but it was still not an ideal solution.
Hi, I’m on a university project involving a weather balloon. We are building our FTU based on your design. However, we could not find a functioning code. Could you kindly reupload the arduino file or a link for them, we would appreciate it very much.
Hello guys,
your project appears to be the only one of this kind … even in 2018 !
I’d like to set it up but the Arduino code link looks dead .
Could you please provide a new one ?
If you could also show the Arduino One – GPS shield connection (just a picture) It would be great for an ‘electronics’ dummy like me.
Many thanks
Maurizio, HAB enthusiast